Parts of a Toilet: Names, Functions, and Common Problems
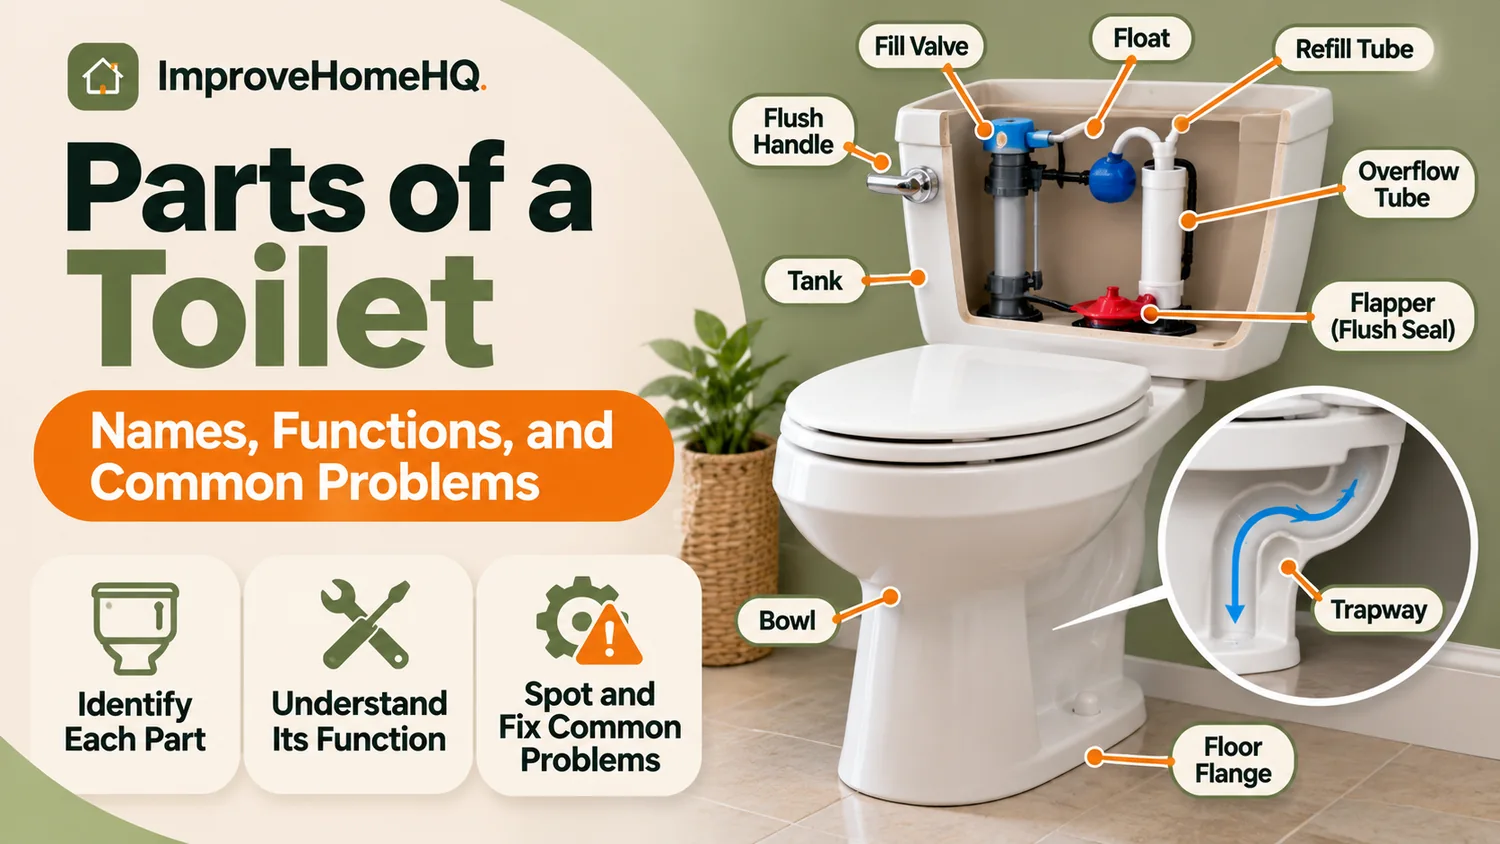
Quick answer: The main parts of a toilet are the tank, bowl, flush handle or button, flush valve, flapper or canister seal, fill valve, float, overflow tube, refill tube, trapway, and floor flange. The tank stores and releases water for flushing; the bowl and trapway carry waste toward the drain. Other essential components—including the supply line, shutoff valve, gaskets, wax ring, and bolts—keep the toilet connected, stable, and leak-free.
If your toilet runs, leaks, flushes weakly, or refuses to refill, knowing which component does what makes troubleshooting easier. This guide covers a typical gravity-flush residential toilet in the United States, with notes on one-piece, dual-flush, and other designs.
Parts of a Toilet at a Glance
A standard two-piece toilet has a tank attached to a separate bowl. Some components are visible without tools; others are hidden inside the tank or beneath the bowl.
| Part | Where you’ll find it | What it does |
|---|---|---|
| Tank and tank lid | Above and behind the bowl | Stores flushing water and protects internal mechanisms |
| Flush handle, button, and trip lever | On or inside the tank | Starts a flush |
| Lift chain | Inside the tank | Connects the lever to a traditional flapper |
| Flapper or canister seal | At the tank’s flush opening | Holds water in the tank until a flush |
| Flush valve | Bottom of the tank | Releases water into the bowl |
| Fill valve | Usually one side of the tank | Refills the tank and stops incoming water |
| Float | Connected to the fill valve | Signals when the tank reaches its target level |
| Refill tube | Near the top of the tank | Directs water to replenish the bowl |
| Overflow tube | Inside the tank, near the flush valve | Routes excess tank water into the bowl |
| Tank-to-bowl gasket and bolts | Between tank and bowl on two-piece toilets | Seal and secure the connection |
| Bowl, rim, and flush passages | Main porcelain fixture | Receive and distribute flushing water |
| Trapway | Curved passage inside the porcelain base | Carries waste out while retaining a water seal |
| Toilet seat and lid | Hinged to the bowl | Provide seating and a cover |
| Closet flange and bolts | At the floor beneath the toilet | Anchor the toilet to the drain connection |
| Wax ring or wax-free seal | Between the outlet and flange | Prevents wastewater and sewer gas from escaping |
| Supply line and shutoff valve | Outside the tank, usually behind it | Deliver and isolate incoming water |
Helpful distinction: The flush valve releases tank water; the fill valve admits fresh supply water. Mixing them up can lead to buying the wrong replacement.
Inside the Toilet Tank: What Each Part Does
The tank contains most of the components that control the flushing and refilling cycle. Carefully remove the porcelain lid and set it on a towel before inspecting anything.
1. Toilet tank and lid
The tank holds the water available for the next flush. Its lid protects the mechanisms and allows access for maintenance. Porcelain lids can chip or break, and replacement lids are not necessarily interchangeable between models.
A one-piece toilet has the tank and bowl formed as one continuous fixture. This changes some mounting hardware, but the basic water-control functions remain similar.
2. Flush handle, button, and trip lever
On a traditional toilet, pressing the exterior handle rotates an arm—called the trip lever—inside the tank. That arm pulls a chain to open the flapper. Some tanks instead use a top-mounted push button, rods, or a dual-flush actuator.
Watch for: A loose handle, jammed lever, or disconnected actuator may cause a weak flush or no flush at all. Some handle mounting nuts use reverse threads, so check your model before tightening.
3. Lift chain
The small chain connects the trip lever to the flapper. It needs enough slack for the flapper to seal completely, but not so much that the handle fails to lift it.
A chain pulled tight can hold the flapper slightly open and cause continuous water loss. Excess slack can make the handle feel ineffective. Adjust the chain at its clip rather than shortening it blindly; some flush designs don’t use a chain.
4. Flapper, flush seal, or canister seal
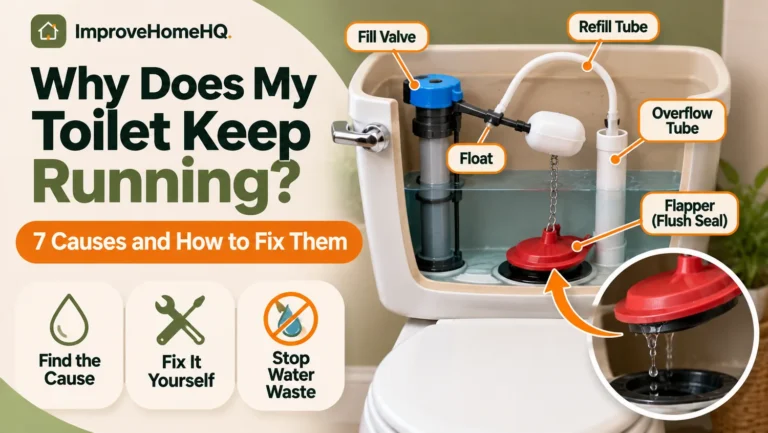
A conventional flapper is a flexible rubber or elastomer seal that sits over the flush valve opening. When lifted, it lets tank water rush into the bowl; when it closes, it retains water for the next flush.
Flappers can harden, warp, collect deposits, or fail to seat correctly. An occasional refill when nobody has flushed—often called ghost flushing—can indicate water slowly escaping through this seal.
Not every toilet uses a flapper. Some KOHLER toilets use a canister-style valve with a replaceable circular seal, while other dual-flush models use a drop-valve mechanism. Identify the design before buying a replacement. KOHLER’s service-parts guide illustrates these differences.
5. Flush valve
The flush valve is the assembly surrounding the opening where tank water enters the bowl. A traditional setup includes a valve seat and typically an attached overflow tube. The flapper seals against the valve seat.
If the seat is pitted, cracked, or severely damaged, installing only a new flapper may not stop the leak. Replacing the entire valve generally requires draining and removing the tank on a two-piece toilet, so confirm the diagnosis first.
Replacement tip: Common flapper and flush-opening sizes include 2-inch and 3-inch designs, but dimensions and mounting styles vary. A part labeled “universal” is not guaranteed to fit every toilet. Match your model or actual valve configuration; see Fluidmaster’s installation guidance.
6. Fill valve
The fill valve lets pressurized household water into the tank after a flush. As the water rises to the intended height, the valve shuts off. It connects to the external supply line through an opening in the bottom or side of the tank, depending on the design.
A failing fill valve may hiss, fill slowly, never shut off, or fail to admit water. Sediment can also affect its operation. First check the shutoff valve, float movement, and manufacturer’s cleaning instructions before replacing the assembly.
7. Float or float cup
The float senses the tank’s water level and controls the fill valve. Older assemblies often use a large ball on a metal rod. Many modern fill valves use a compact cup that slides along a vertical shaft.
The term ballcock usually refers to an older style of fill-valve assembly, not to every toilet float. Modern fill valves still use floats even though they look different.
If the tank water rises into the overflow tube, the float may be set too high or the fill valve may not shut off. If the level is too low, flush performance may suffer. Follow the tank’s marked waterline or model-specific instructions rather than guessing at a setting.
8. Overflow tube
The overflow tube is the upright, open-ended passage that channels excess tank water into the bowl if the fill valve overfills the tank. It provides a safeguard against overfilling from this cause, but it cannot protect against every kind of leak, such as a cracked tank or leaking connection.
Water steadily spilling into the tube generally points to an incorrect water level or a fill valve that isn’t closing. Don’t confuse the overflow tube with the fill valve standing nearby.
9. Refill tube and clip
The narrow flexible refill tube routes some incoming water from the fill valve toward the overflow tube so that the bowl returns to its proper standing-water level after flushing.
The outlet should be secured with the appropriate clip and positioned above the overflow opening as directed by the manufacturer. Pushing the tubing too far down can cause siphoning and intermittent refilling. Fluidmaster’s instructions specifically warn against inserting it into the overflow pipe.
10. Tank-to-bowl gasket, mounting bolts, and washers
On two-piece toilets, mounting bolts attach the tank to the bowl, while a large rubber gasket seals around the flush-water passage. Rubber washers also seal mounting holes where required by the design.
Water leaking between the tank and bowl during a flush may indicate a deteriorated gasket, bolt seal, or cracked porcelain. Tightening hardware excessively can crack the tank. Replace damaged seals and follow the manufacturer’s assembly sequence.
Toilet Bowl and Base Parts
The bowl assembly receives flushing water, moves waste into the building drain, and maintains the standing-water seal that blocks sewer gases.
11. Bowl and rim
The bowl is the porcelain basin that holds standing water and receives waste. The rim is its upper edge. Many toilets have small rim openings or channels that distribute water around the bowl; other designs use a rimless wash system.
Mineral deposits can reduce water distribution. Use cleaning methods compatible with your toilet’s finish. Avoid forcing sharp metal tools into glazed openings, which can scratch the surface.
Round vs. elongated: These describe bowl shapes, not flush mechanisms. Measure the seat mounting holes and the distance to the front of the bowl before choosing a replacement seat.
12. Siphon jet and trapway
Some toilets have a larger opening near the bottom of the bowl called a siphon jet. It directs water toward the trapway to help initiate the flush. Other designs use different water-delivery patterns.
The trapway is the curved passage formed inside the porcelain. During a gravity flush, water and waste travel through it toward the drain. Afterward, water left in the bowl and trapway creates a seal that helps keep sewer gases out of the room.
A partial obstruction in the trapway can cause a sluggish flush even when the tank parts work properly. A flange auger designed for toilets is generally safer for porcelain than improvised sharp objects.
13. Toilet seat, lid, hinges, and bumpers
The seat is attached to the bowl with hinges and fasteners; the lid covers the opening. Bumpers cushion contact with the porcelain. Replacement seats can offer slow-close hinges, quick-release cleaning, or integrated bidet features.
Check round or elongated sizing, bolt-hole spacing, and any special mounting system. A bidet seat may also require electrical power and a suitable supply connection; follow the product’s installation requirements.
14. Toilet horn, closet flange, and closet bolts
The toilet horn is the outlet underneath the porcelain base. It aligns with the floor drain and the closet flange, also known as a toilet flange. The flange connects the fixture to the drainage system and provides slots for the closet bolts that secure the toilet to the floor.
Flanges may be PVC, ABS, cast iron, or another approved material, depending on the installation. A broken or loose flange can cause movement and compromise the seal below the toilet. Oatey recommends installing the flange on top of the finished floor and anchoring it securely; consult its flange installation best practices.
Safety note: Don’t assume tightening the closet bolts will fix a rocking toilet. Inspect for a damaged flange, improper support, or soft flooring. Overtightening can crack porcelain.
15. Wax ring or wax-free toilet seal
A wax ring compresses between the toilet outlet and the flange to keep wastewater and sewer gas from escaping. Wax-free systems use manufacturer-specific rubber, foam, or other gasket designs.
A traditional wax ring should be replaced whenever the toilet is lifted and reset. Don’t reuse the compressed ring or stack ordinary wax rings to compensate for a low flange. Choose an appropriate extra-thick seal or correctly installed flange extension when needed. Oatey’s wax-ring replacement guide covers flange inspection and sealing choices.
A wet floor near the base is not proof the wax ring failed: condensation, a leaking supply connector, or water escaping from the tank can also run down to the floor. Trace the water’s source before removing the toilet.
Water Supply Parts Outside the Toilet
16. Shutoff valve
The shutoff valve, often an angle stop on the wall or floor behind the toilet, isolates water to the fixture. Turn it off before disconnecting the supply line or performing repairs that could release water.
Older shutoff valves sometimes fail to close fully. If the valve leaks or won’t shut off, stop and arrange a safe upstream shutoff before proceeding.
17. Water supply line
A flexible braided hose or other approved connector carries water from the shutoff valve to the fill valve. Leaks can occur at fittings or along a damaged connector.
Never assume a connector can be reused indefinitely. Replace one showing corrosion, kinks, bulges, damaged seals, or active leaks, and follow its manufacturer’s instructions. Do not over-tighten plastic fill-valve threads.
How All the Components Work Together During a Flush
- Ready position: The tank is full to its set level. The flapper or canister seal is closed, and the bowl contains standing water.
- You activate the flush: A handle, chain, button, or actuator opens the flush valve seal.
- Water enters the bowl: Stored water moves rapidly through the flush passages and, on some models, the siphon jet.
- Waste exits: The bowl’s water flow moves waste through the trapway to the building drain.
- The flush seal closes: As the tank empties, the flapper or equivalent seal closes the opening.
- The tank and bowl refill: The fill valve admits fresh water; the refill tube supplies bowl water. The float shuts the fill valve when the intended tank level is reached.
This sequence explains why a single failed part can affect the entire flush. A leaking flapper can repeatedly trigger the fill valve, while a misrouted refill tube can leave the bowl underfilled.
Which Toilet Part Is Causing the Problem?
Use these signs to narrow the issue before buying replacement parts.
| Symptom | Parts to check first | Useful first test |
|---|---|---|
| Toilet keeps running | Flapper/canister seal, chain, float, fill valve | See whether water is escaping past the seal or over the overflow tube |
| Toilet refills by itself | Flush seal, refill-tube placement | Perform a tank dye test and inspect tube position |
| Handle moves but nothing flushes | Trip lever, chain, actuator | Remove lid and watch the mechanism while activating it |
| Weak or incomplete flush | Tank water level, flapper opening, rim passages, trapway | Check tank level and observe whether the flush seal lifts fully |
| Tank fills very slowly | Shutoff valve, supply line, fill valve | Verify the supply valve is fully open; check for restrictions |
| Water leaks between tank and bowl | Tank-to-bowl gasket, bolt washers | Dry fittings and inspect while flushing |
| Water collects at the toilet base | Supply connections, condensation, floor seal, flange | Dry everything and identify exactly when and where water reappears |
| Toilet rocks or shifts | Closet bolts, flange, shims, floor condition | Stop using excessive force and check for damaged support |
| Bowl water stays unusually low | Refill tube, refill adjustment, trapway, venting | Observe refill operation; investigate persistent gurgling or drainage issues |
| Seat shifts | Seat bolts, hinges, bumpers | Tighten or replace mounting hardware to specification |
Two simple checks before replacing anything
For a running toilet: Remove the lid and observe the water. If it is flowing down the overflow tube, inspect the fill valve and float setting. If the water level slowly drops without reaching the overflow, check the flush seal and chain.
For a suspected flapper leak: Add a few drops of food coloring to the tank without flushing. If colored water appears in the bowl after about 10–15 minutes, the tank is leaking into the bowl, commonly through a worn or poorly seated flapper or canister seal. KOHLER recommends this type of dye test.
Before working inside a tank, keep hands clear of moving parts and protect the ceramic lid. Shut off the water and drain the tank before disconnecting plumbing or removing internal valves.
How to Choose the Right Replacement Toilet Part
Knowing the name of a component is only half the job. Toilet parts can look similar and still be incompatible.
- Find the toilet’s brand and model. Look for markings inside the tank, beneath the tank lid, or on the manufacturer’s documentation. Brands such as American Standard, KOHLER, and TOTO have model-specific repair assemblies.
- Identify the flush system. Is it a rubber flapper, a canister seal, or a dual-flush drop valve? Different systems use different seals and actuators.
- Check dimensions and configuration. Flapper/flush valve sizes, fill-valve clearance, tank-to-bowl gaskets, and seat shapes are not all identical.
- Inspect the original part. Photograph it before disassembly, including mounting points and seals. Compare with the replacement part’s instructions rather than relying only on packaging claims.
- Replace related seals when appropriate. If a repair requires removing the tank, inspect its mounting washers and main gasket. Do not automatically replace functioning parts, but avoid reinstalling visibly damaged seals.
- Test for leaks before finishing. Restore the water gradually, observe a complete fill-and-flush cycle, and recheck joints after the tank has been sitting full.
For model-specific guidance, use the toilet manufacturer’s service-parts lookup. Fluidmaster makes common aftermarket fill valves and flappers, while Oatey supplies flanges and sealing products. Brand names are useful for finding instructions, not evidence that any one product fits every toilet.
Common Mistakes to Avoid
- Buying a flapper without checking the flush system. A canister-style toilet may need a seal instead.
- Confusing the flush valve with the fill valve. They control opposite parts of the cycle.
- Setting the tank water level too high. Water continuously entering the overflow tube wastes water and masks a fill-valve problem.
- Putting the refill hose too deep into the overflow tube. This can siphon water and create intermittent refilling.
- Overtightening nuts or floor bolts. Porcelain can crack under excessive force.
- Reusing an old wax ring. Wax seals are single-use once compressed.
- Ignoring a rocking toilet. Movement can damage the floor seal and may indicate structural or flange trouble.
- Using drop-in tank cleaners without checking instructions. Some manufacturers warn that chlorine or bleach tablets can damage rubber seals and void relevant warranties; see Fluidmaster’s flush-valve guidance.
When to Repair a Part and When to Replace the Toilet
A failed flapper, seat, fill valve, or accessible gasket can often be replaced without buying a new toilet. Replacement becomes more reasonable if the porcelain is cracked, multiple repairs keep recurring, the correct parts are unavailable, or the toilet uses unusually large amounts of water.
According to the U.S. Environmental Protection Agency, toilets account for nearly 30% of an average home’s indoor water use. EPA WaterSense-labeled toilets use 1.28 gallons per flush or less, approximately 20% less than the federal 1.6-gallon-per-flush standard, while meeting independent performance criteria. That doesn’t mean replacing a working toilet is always necessary; it gives you a useful benchmark when considering an upgrade.
Call a licensed plumber if you find damaged drain piping, a broken flange embedded in an uncertain floor structure, active hidden leaks, repeated sewer odors, or sewage backing up through fixtures. A cracked tank or bowl generally calls for fixture replacement rather than a temporary patch.
Frequently Asked Questions
What are the five main parts of a toilet?
For a basic overview, the five major components are the tank, bowl, flush valve, fill valve, and trapway. The flapper or canister seal, float, and other hardware are also essential to normal operation.
What is the difference between a flapper and a fill valve?
The flapper seals the water outlet at the bottom of a traditional tank. The fill valve brings in fresh water after flushing and shuts it off when the tank is full. They serve different purposes and are not interchangeable.
What is the name of the part that stops a toilet from running?
It depends on the cause. The fill valve stops incoming water at the correct level, while the flapper or canister seal prevents stored tank water from leaking into the bowl. Either can be responsible for a running toilet.
What is the pipe sticking up inside a toilet tank?
The open vertical pipe near the center is usually the overflow tube. Another tall assembly, typically attached to the incoming supply line and a float, is the fill valve. The two have different jobs.
What holds a toilet to the floor?
Closet bolts anchor the toilet to a floor-mounted closet flange. The flange attaches to the drainage connection, while a wax or wax-free seal prevents leaks between the toilet outlet and drain.
Are toilet tank parts universal?
Some fill valves and repair kits are adjustable and fit many common gravity toilets, but flush seals, mounting gaskets, canisters, buttons, and specialty assemblies can be model-specific. Verify compatibility before purchasing.
Can I fix a running toilet myself?
Often, yes. Checking the chain, adjusting the float, cleaning or replacing a compatible flush seal, and replacing certain fill valves are common homeowner repairs. Shut off water before disassembly and follow the manufacturer’s instructions. Get professional help when a repair involves damaged porcelain, inaccessible plumbing, or recurring leaks.
Do all toilets have a flapper?
No. Many traditional gravity toilets use flappers, but canister-style and some dual-flush designs use different mechanisms and seals. Pressure-assisted toilets also have different internal components and should be serviced using their specific instructions.
Final Takeaway
A toilet is easier to understand when you separate its three jobs: releasing water, refilling water, and carrying waste away. The handle and flush valve release stored water; the fill valve and float refill the tank; and the bowl, trapway, flange, and seals direct waste safely into the drain system.
When something goes wrong, start with the symptom, identify the relevant component, and verify the replacement part against your toilet model. A careful diagnosis is usually more valuable than replacing several parts at once.