Why Does My Toilet Keep Running? 7 Causes and How to Fix Them
Quick answer: A toilet that keeps running usually has a worn flapper, a chain that prevents the flapper from closing, a float set too high, or a fill valve that won’t shut off. Remove the tank lid and watch what happens after a flush. Water spilling into the overflow tube points to the float or fill valve; water leaking from the tank into the bowl points to the flapper or flush valve seal. Most problems can be fixed without replacing the toilet.
A toilet should stop making noise shortly after the tank refills. If you hear steady hissing, trickling, or a surprise refill long after the last flush, water is going somewhere it shouldn’t.
The good news is that most running-toilet problems involve parts you can see inside the tank. You don’t need to take the toilet off the floor to investigate. Start by observing the water level, then follow the fix that matches what you find.
Why Does My Toilet Keep Running? The Most Common Causes
In a typical gravity-flush toilet, pressing the handle lifts a rubber flapper or flush seal. Water leaves the tank and flushes the bowl. The seal closes, and a fill valve adds fresh water until a float tells it to stop.
If the seal leaks, the tank loses water and refills again. If the fill valve fails to shut off, incoming water may escape through the overflow tube. Both problems sound like a running toilet, but the repairs are different.
| What you notice | Most likely cause | What to check first |
|---|---|---|
| Tank refills for a few seconds when nobody flushed | Leaking flapper or flush valve seal | Test for a tank-to-bowl leak |
| Water pours into the top of the overflow tube | Float too high or fill valve not shutting off | Lower the float, then retest |
| Toilet runs immediately after you release the handle | Chain too tight, tangled, or sticking handle | Check that the flapper falls flat |
| Persistent hissing near the fill valve | Debris or worn fill valve seal | Confirm the valve won’t shut off |
| Repeated refills despite an apparently good flapper | Refill tube siphoning or concealed seal leak | Inspect refill tube placement |
| Water level drops while the supply is turned off | Leak through the flapper, flush valve, or seal | Check the flush valve seat |
First, rule out an actual overflow or external leak. If water is on the floor, the tank is cracked, or a supply connection is spraying, turn off the water if you can do so safely and address that leak before continuing.
How to Find Out Where the Water Is Going
You can usually narrow down the problem in five minutes without buying a part.
Step 1: Watch the tank refill
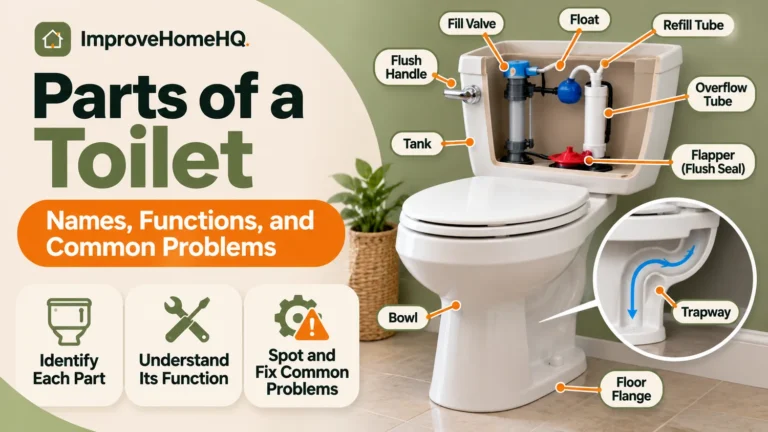
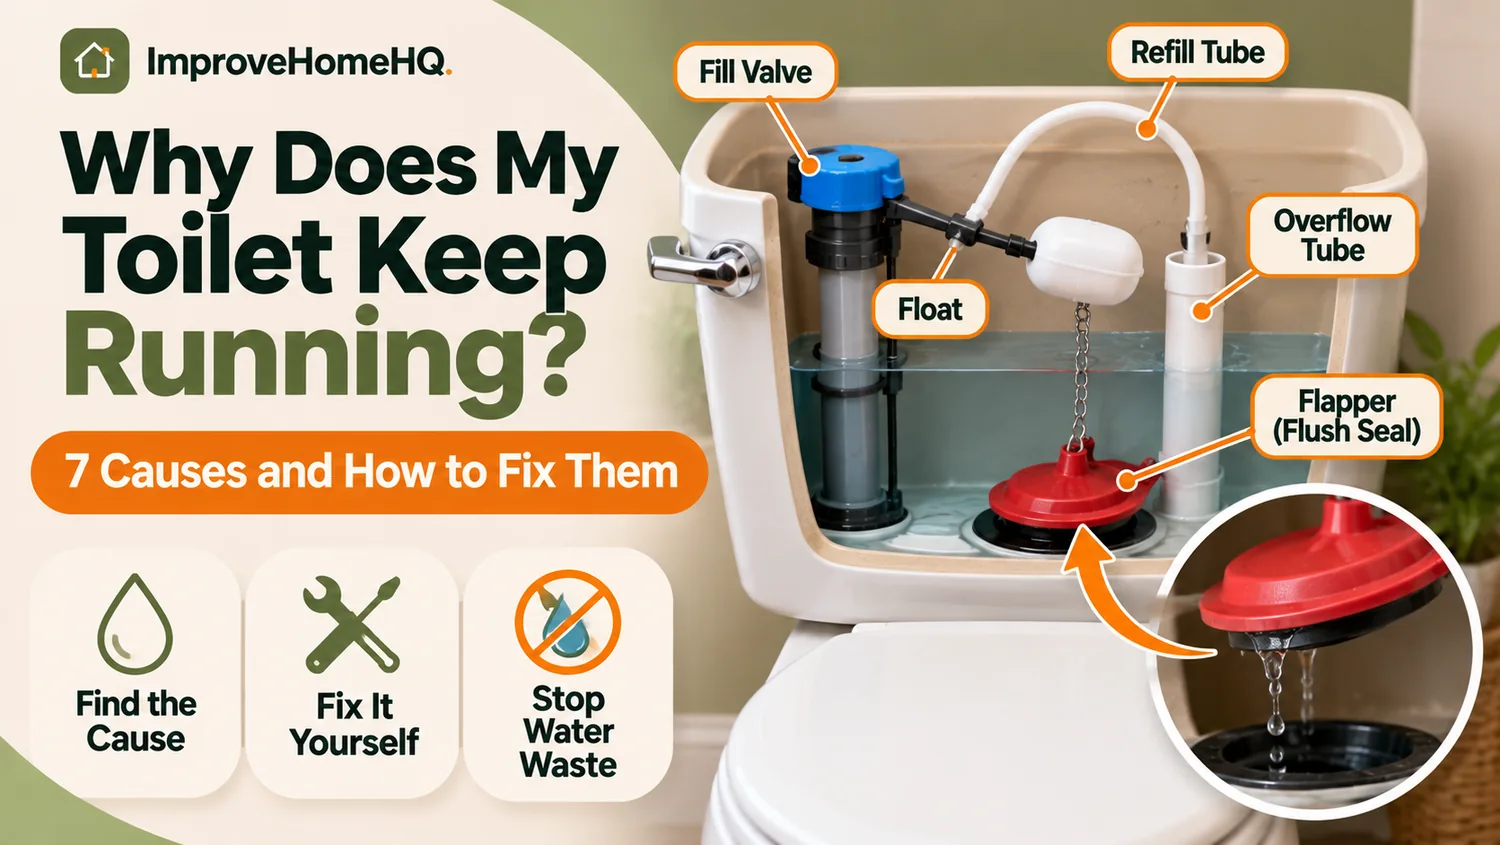
Carefully lift off the porcelain tank lid and set it on a towel. Flush once and watch the process. Identify these components:
- Flapper or flush valve seal: The seal covering the large opening at the bottom of the tank. Some newer toilets have a canister or tower-style flush valve instead of a traditional flapper.
- Flush chain and handle arm: The linkage that lifts the seal.
- Fill valve and float: The taller assembly, commonly at one side of the tank, that controls incoming water.
- Overflow tube: The open vertical tube that directs excess tank water into the bowl.
- Refill tube: A small flexible tube that delivers a portion of refill water into the overflow opening to replenish the bowl.
A brief flow from the refill tube during normal tank refilling is expected. What matters is whether water keeps flowing after the tank should be full.
Step 2: Check the overflow tube and water line
After a flush, let the tank fill. If the water reaches the top of the overflow tube and continues spilling into it, the fill system is not stopping at the correct level.
Look for a water-level mark inside the tank or follow the toilet manufacturer’s instructions. On many conventional tanks, the target is roughly 1/2 to 1 inch below the top of the overflow tube, but the marked level and model-specific instructions take priority. Don’t lower the float excessively; too little water can cause weak flushes.
If water is not entering the top of the overflow tube but the toilet intermittently refills, suspect water loss past the flush seal or unintended siphoning through the refill tube.
Step 3: Do the 10-minute food-coloring test
A silent leak may not leave any obvious ripples.
- Let the tank finish filling, then avoid flushing.
- Add a few drops of food coloring to the tank, not the bowl.
- Wait 10 minutes without flushing.
- Look for the color in the bowl. Flush afterward so the dye doesn’t stain the porcelain.
If color appears in the bowl, tank water is escaping into it. A worn or misaligned flapper is a common culprit, but a worn canister gasket, damaged flush valve seat, or certain overflow-related leaks can produce a similar result. The test confirms a leak; it doesn’t identify the exact part by itself.
The U.S. Environmental Protection Agency’s WaterSense maintenance guidance recommends this simple test and advises checking toilet seals regularly.
Step 4: Turn off the supply to confirm a slow leak
If the source is still unclear, mark the current tank water level with a removable piece of tape on the outside of the tank or note its position relative to a molded mark. Gently turn the toilet’s shutoff valve clockwise until closed. Leave the toilet unused for 15–30 minutes, then check the water level.
If the level falls, tank water is leaking out, usually into the bowl. If it stays put, investigate a fill-valve problem that occurs only with the supply on. A very slow leak may require a longer observation period.
Don’t force a stuck, corroded shutoff valve. An old valve can begin leaking when disturbed; call a plumber if it won’t operate normally.
How to Stop a Toilet From Running: Fixes in the Right Order
Before replacing anything, try the simplest adjustment that matches the diagnosis. Turn off the shutoff valve before removing components, and keep a towel nearby. Avoid overtightening plastic fittings or tank hardware; porcelain can crack.
1. Straighten or adjust the flapper chain
Best clue: The toilet runs right after flushing, or jiggling the handle temporarily stops it.
Look at the chain between the handle arm and the flapper. When the flapper is shut, the chain should have a little slack. A tight chain holds the seal open. An excessively long chain can catch under the flapper or tangle around the arm.
To fix it:
- Turn off the water if you need to work with your hands inside the tank.
- Unhook the chain from the handle arm.
- Move the hook to a link that allows a small amount of slack when the flapper is seated.
- Make sure the loose end cannot fall beneath the seal.
- Turn the water back on, flush, and confirm the flapper closes completely.
If the handle itself sticks, check whether the handle arm catches on other tank parts. Adjust or replace a damaged handle assembly as needed. Some toilet handle nuts have reverse threads, so check the model before turning or tightening one.
2. Clean or replace a worn toilet flapper
Best clue: The tank slowly loses water, the toilet refills by itself, or dye appears in the bowl.
Over time, rubber seals can become stiff, warped, cracked, or covered with deposits. First check that the flapper sits squarely on the flush valve opening. With the water turned off and the tank drained, wipe away loose deposits from the sealing surface using a soft cloth. Don’t scrape the seat with a metal tool.
If the flapper is damaged or still leaks, replace it:
- Close the supply valve and flush to empty most of the tank.
- Disconnect the chain from the handle arm.
- Release the flapper’s side ears or other attachment points.
- Take the old part or the toilet’s model number to the store to get a compatible replacement.
- Install the new flapper, attach the chain with slight slack, and restore the water.
- Flush several times and repeat the dye test.
Fit matters. Toilets can use different flush valve sizes and proprietary seals. A flapper that seems close enough may leak or close at the wrong time. For a canister-style or dual-flush toilet, replace the specified flush valve gasket or seal rather than trying to fit a standard flapper.
The EPA recommends replacing conventional toilet flappers at least every five years as preventive maintenance. That is a useful inspection and replacement guideline, not a guarantee that every seal will last five years.
3. Lower a float that’s set too high
Best clue: The water reaches the top of the overflow tube and continues spilling down it.
Older toilets may have a floating ball attached to an arm. Many newer fill valves use a plastic float cup that slides alongside the valve body. Both signal the fill valve to shut off as the tank fills.
Look for an adjustment screw, rod, or release clip. Depending on the design, turn the adjustment screw or reposition the float according to the fill-valve instructions to lower the shutoff level. Make small changes, flush, and watch the water stop.
Stop adjusting when water reaches the tank’s marked fill line and stays below the overflow opening. If the level continues climbing even after a proper float adjustment, the valve itself may be faulty. If the float rubs against the tank wall or another component, correct the interference.
4. Clean or replace a fill valve that won’t shut off
Best clue: You hear steady hissing near the fill valve, or water continues entering the tank even when the float has reached its shutoff position.
Sediment can lodge in a valve’s cap or seal. Its internal rubber seal can also wear out. Some valves can be flushed or fitted with a replacement cap seal; others are simpler to replace entirely.
Start by checking the exact valve model and its instructions. For a serviceable valve, turn off the supply, flush the toilet, and follow the manufacturer’s cap-removal and cleaning steps. Do not pry apart an unfamiliar valve or turn the supply on with an uncovered valve unless the manufacturer’s procedure explicitly calls for a controlled flush with a container in place.
If cleaning and float adjustment don’t work, replace the fill valve:
- Shut off the supply, flush, and sponge out remaining tank water.
- Disconnect the supply line beneath the tank with a towel and container ready.
- Remove the fill valve’s mounting nut and lift out the old valve.
- Fit a compatible replacement at the height specified in its instructions.
- Secure it without overtightening, reconnect the supply, and attach the refill tube correctly.
- Restore water, inspect every connection for leaks, and adjust the final tank water level.
For model-specific cap cleaning, replacement seals, and setup, consult the instructions for the valve you actually own. For example, Fluidmaster’s installation and troubleshooting instructions cover both valve seals and refill-tube positioning.
Stop and get help if the shutoff valve won’t close, the supply nut is seized, plastic threads are damaged, or water leaks outside the tank after reassembly.
5. Reposition a refill tube that’s causing siphoning
Best clue: The fill valve repeatedly kicks on, but the flapper seems sound and the water level is not spilling over the overflow tube.
The narrow refill tube should be held by a suitable clip or adapter so its outlet directs water into the overflow tube from above. On many assemblies, pushing the flexible tube too far down the overflow pipe can create a siphon that keeps drawing tank water into the bowl after refilling ends.
Inspect the refill tube. If its open end is submerged or inserted too far inside the overflow pipe, position it with the proper clip or adapter above the opening, as the manufacturer specifies. Keep the tube unkinked and securely attached. Flush again and observe whether the repeated refilling stops.
Don’t remove or permanently block the refill tube. It serves a purpose: restoring water to the bowl after a flush. A poorly adjusted tube can leave too little bowl water even when the tank itself fills correctly.
6. Check the flush valve seat, gasket, and overflow tube
Best clue: A new, correctly fitted flapper doesn’t solve the dye-test leak.
The opening beneath the flapper is the flush valve seat. If it is rough, cracked, or coated with stubborn scale, even a new flapper may not seal. A damaged canister seal or a crack in the overflow tube can also allow water to escape.
Turn off the water and inspect the valve seat for damage and the overflow tube for cracks. Wipe away light deposits. If the plastic valve body is cracked or the sealing surface is permanently damaged, replacing the flush valve assembly may be necessary.
That job can involve removing the tank from the bowl, replacing gaskets, and reseating hardware. It’s more involved than replacing a flapper. If you’re unfamiliar with tank-to-bowl fittings or see damaged porcelain, a plumber is the safer choice.
7. Address a sticking or incompatible flush mechanism
Best clue: The problem began after a repair, or a dual-flush button or tower doesn’t return completely after flushing.
Push-button and tower-style flush systems may use cables, push rods, buttons, or a sliding canister rather than a simple chain. A misadjusted button can keep the flush valve partly raised. Replacement seals that are too large, too small, or incorrectly installed may also leak.
Check that the button or lever returns freely and that the seal drops fully into position. Compare the assembly with the toilet manufacturer’s diagram before adjusting cables, rods, or tower parts. A model-specific gasket is usually preferable to a generic part if the original design requires it.
What If Your Toilet Runs Only Sometimes?
The timing of the noise is a valuable clue.
It runs for a few seconds every hour
This is often called phantom flushing: water slowly escapes from the tank into the bowl until the fill valve briefly turns on to replenish it. Start with the dye test, flapper alignment, flush seal, and refill tube. The toilet isn’t actually flushing by itself; the tank is topping up lost water.
It runs continuously right after a flush
Watch the flapper settle. If it stays lifted, correct the chain, handle, or push-button mechanism. If it closes but water keeps entering through the fill valve, inspect the float setting and overflow tube.
It makes a short hiss as the tank finishes filling
A brief change in sound while the fill valve closes can be normal. A hiss that does not end, or keeps returning when nobody uses the toilet, deserves investigation. Check whether the water is creeping into the overflow tube or escaping through a flush seal.
It keeps running after a new flapper was installed
Don’t automatically buy another one. Confirm the part is compatible, the chain has slack, and the sealing seat is clean and undamaged. If the dye test is negative but water still enters the overflow tube, shift your attention to the float and fill valve. Also check the refill tube for siphoning.
How Much Water Can a Running Toilet Waste?
More than many homeowners expect. Waste depends on the leak rate and how long it continues, so there is no single accurate daily figure for every running toilet.
For perspective, the EPA’s WaterSense materials give examples of a small toilet leak at roughly 0.02 gallons per minute (about 860 gallons per 30 days) and a medium leak at 0.2 gallons per minute (about 8,600 gallons per 30 days). A severe stuck-valve problem can waste substantially more. These are illustrative rates, not measurements of your own toilet.
Water bills depend on local rates and whether sewer charges are tied to metered usage. Regardless of the exact cost, a leak that repeatedly refills the tank is worth fixing promptly.
Should You Repair the Toilet Yourself or Call a Plumber?
Adjusting a chain or float, replacing a straightforward flapper, and performing a dye test are reasonable DIY jobs for many homeowners. Replacing a fill valve is also manageable if the shutoff works, the fittings are accessible, and you can follow the manufacturer’s instructions.
Call a licensed plumber when:
- The toilet still runs after the likely part has been correctly repaired.
- The shutoff valve is stuck, leaking, or can’t fully stop the water.
- Water leaks onto the floor from the tank, supply connection, or base.
- The tank or bowl is cracked, or the flush valve requires extensive disassembly.
- The toilet has an unfamiliar concealed, pressure-assisted, or specialized flush system.
- You notice moisture damage, a rocking toilet, or sewage odors.
A leaking wax ring at the floor is not a typical cause of tank water running continuously. It’s a separate problem that may show up as water around the base after a flush and needs its own diagnosis. Similarly, a clog generally does not explain ongoing water flow into the tank.
If the toilet can’t be repaired immediately, shut off the toilet’s water supply between uses, provided the valve works and there are no active exterior leaks. Avoid relying on this as a permanent fix.
How to Keep a Toilet From Running Again
A little preventive attention can catch an internal leak before a high bill arrives.
- Check for silent leaks annually. Use the 10-minute dye test, then flush away the coloring.
- Inspect the flapper or flush seal. Look for brittleness, distortion, and deposits. Replace a worn part with a compatible model.
- Keep the tank water at its marked level. If the fill valve starts creeping above that line, investigate before it begins to overflow.
- Avoid drop-in tank cleaners unless the toilet and replacement-part manufacturers approve them. Some chemicals can accelerate deterioration of rubber components.
- Check for a new running sound after any repair. Observe at least two flush cycles and make sure no external connections drip.
If your older toilet needs repeated major repairs, compare the cost of repair with replacement. When replacement makes sense, a WaterSense-labeled toilet can improve water efficiency compared with an older high-volume model—but a simple flapper leak rarely justifies replacing an otherwise sound toilet.
Frequently Asked Questions
Why does my toilet keep running even when the tank is full?
If water is flowing over the top of the overflow tube, the float may be set too high or the fill valve may not be shutting off. If the water stays below the overflow but the toilet repeatedly refills, look for a leaking flush seal or refill-tube siphoning.
How do I stop a running toilet immediately?
Turn the small shutoff valve on the supply line behind or beside the toilet clockwise until it closes, without forcing it. This stops fresh water entering the tank. It doesn’t repair the underlying problem; inspect the tank before restoring the supply.
Why does my toilet run every 10 or 20 minutes?
A slow leak usually lowers the tank’s water level until the fill valve turns on briefly. A worn flapper or flush valve gasket is a common cause. A mispositioned refill tube can sometimes create a similar repeated-refill pattern.
Can a running toilet fix itself?
A chain may briefly shift into place or sediment may move, making the noise stop temporarily. But worn seals and unreliable valves usually continue causing trouble. Test the toilet rather than assuming a quiet interval means the leak is gone.
Does a running toilet mean there’s a leak?
Usually, yes—either water is escaping from the tank into the bowl or incoming water isn’t shutting off. That doesn’t necessarily mean water is leaking onto your bathroom floor. An internal tank-to-bowl leak can be silent and still waste significant water.
Is it safe to leave a toilet running overnight?
An internal leak may not immediately damage the room, but it can waste water and conceal other problems. If you can’t repair it, shut off the toilet’s water supply when practical. If you see water escaping outside the fixture, address it promptly rather than leaving it unattended.
The Bottom Line
A running toilet is most often a small-part problem, not a reason to replace the whole fixture. Check where the water goes before you buy anything: into the overflow tube suggests a fill-valve or float issue; a tank-to-bowl leak points toward the flapper or flush valve seal. Correct a tangled chain or misplaced refill tube, and use the dye test to verify the fix. If the water won’t shut off or the tank is leaking externally, bring in a plumber.